Homemade Cashmere Long John Top.

DSC_0672

DSC_0656

DSC_0648

DSC_0661

Although it has warmed up here considerably (+20 yesterday!) we're still in our long johns everyday. We keep the thermostat low (62ish) and head out into the snow each day. Lupine's cashmere long johns have been a huge hit, so I finished stitching up a coordinating shirt for her as well.

I used a long sleeve t-shirt pattern that I had on hand as the springboard for my pattern. (From Ottobre winter 2004, if you want specifics.) I used the existing sweater sleeves but narrowed and shortened them from the shoulder and also used a portion of the existing neck hole to avoid having to add ribbing that I didn't have on hand. The neck was a bit too small so I added a notch at the manufactured seam to make it go on easily.

Because Lupine wears dresses almost every day I left the shirt extra long (to keep her extra warm), and decided to make the sleeves cuffed. My theory is that next winter with the extra length in the body and arms it will still fit. Soft, warm, and woolly. $1.50 and fifteen minutes. Works for me.

Hooray for homemade!

Unraveling: Recycling Wool from Sweaters.

DSC_0352

DSC_0350

DSC_0349

DSC_0367

I spent the weekend in the city with my sister. There was good food, good conversation and – of course – a lovely bit of thrifitng. While we didn't have a cabbage glass moment like the last time, we did find a few treasures including two cashmere sweaters to felt and sew with and two lambswool sweaters to unravel, dye, and reuse.

The project above is my first sweater unraveling project (except when knitting goes wrong). It was inspired by my love of knitting combined with doing the math on a knitting a sweater with new wool. (Once yarn is purchased the cost of a homemade sweater far exceeds what I would ever spend on a purchased sweater.) I found two perfect candidates this weekend both ready to dye and both buttery soft, and costing me $4 and $6 each. I'll share my progress with you as these projects take shape!

Making: Felted Slippers

I had every intention of finishing Pete's Solstice sweater in time for Solstice. But when I started unraveling the sleeves (don't ask) I needed a plan B for his gift.

Enter the felted clogs. Pete has been slipper free all the cold season after wearing through last year's pair in the spring. He's been schlepping around the house in an (ugly) pair of brown Crocs. I cast these on a few weeks ago as his alternate Solstice gift. They were immense when I finished knitting them up but on Solstice Eve we felted them down in the washer and they've been on his feet ever since.

All of the yarn was from my stash (most from a yard sale and a bit left over from various projects) so they were nearly free. And he loves them. I added a contrasting inner sole (leftover wool "hair" from a sweet Waldorf doll) and I love the contrast when the slippers are set aside awaiting some cold toes.

DSC_0027

DSC_9697

DSC_0033

(Oh, and in case you were wondering they moon walk beautifully. Which is important around here. We take our silliness very seriously. Ahem.)

DSC_0029

Making: Peg Person Zipper Pull and Spy Hat

We are gearing up for winter over here in a big way. Buried in snow, there is no denying that it is almost January and we have chosen to live in Wisconsin.

That winter-gear-up means – yes – more crafting. (Of course!) Lupine inherited a second-hand coat this year that we love. But alas, the zipper pull was MIA. Lupine wanted the independence of being able to unzip her own gear, so for the past three months she's been sporting an attractive paperclip looped through the broken pull. A paperclip zipper pull is functional but also awkward and ugly, so it was time to upgrade.

DSC_0049

The kids and I spent the afternoon paining wooden peg people. I painted this peg girl (bought here) with acrylic and finished her with a dusting of fine glitter over tacky glue. When fully dry I sprayed her with clear coat (so that she'll hold up to the abuses of the sledding hill) and drilled a tiny hole in her head. Ouch. I inserted a screw eye and secured it with super glue. I twisted the screw eye onto a small split ring key chain from the hardware store and Lupine had a functional coat once more.

DSC_0056

To add to the winter-cuteness-overload, Lupine also has a sweet new hat as of this weekend. Sadly, this fall Lupine's beloved bluebird hat was lost on a hike. She's been getting by with one of Sage's thrift store hats but it isn't very warm and she's not so into winter anyway. The cold head? Not helping her relationship with the cold and snow.

I picked up some roving recently to work on my spinning skills and chose colors to match the coat above. Still a newbie spinner, the results are wonky at best but it was great practice. The result was extremely/unpredictably bulky but I thought it would work great for a hat. Lupine chose this pattern that we found on Ravelry and with that chunky yarn it knitted up in a day.

DSC_9822

DSC_9833

yarn before

DSC_0041

yarn after

DSC_0045

DSC_0043

The faces above pretty much speak for themselves. She loves her "Spy Cat Hat" (which can be worn rolled up in the front for a non-spy look as well). She loves it, I tell you. And it's pink, but so not girlie. (I suspect we may be leaving the queen and fairy phase and entering a new era of Lupine all together. It looks to be loads of fun.)

Off we go to the sledding hill!

DSC_0062

Making: Waldorf Baby Doll

DSC_9939

Lupine loves babies. Real babies, doll babies, babies in books, animal babies, plastic babies. She has been begging for a plastic doll for more than a year and seeks them out constantly at thrift store and friend's houses.

Hm. The plastic doll.

Here is where I reveal my doll snobbery. I know. There is a plastic doll in your playroom, right? I'm not harping on you. Really. I'm just… not crazy about the plastic baby doll.

There are many reasons, some of which are aesthetic (why are some of they so creepy?), some of which are environmental (hello, petroleum), some of which are comfort-based (snuggling a poky plastic doll at night? Ouch.). But mostly it comes down to the imagination. Plastic dolls leave far less room for imagination than a more open-ended cloth doll – homemade or otherwise. Everything is right there at the surface – toes, fingers, wrinkles, belly buttons – and in some cases bodily functions, baby-sounds, and movement – even that strange baby powder-ish smell. There is little left for the mind of the child to shape on their own. 

DSC_9932

I suspected that Lulu's plastic doll obsession might fade if I made her a Waldorf doll that was a baby – in its face, its form, its proportions, and its heft. I had this pattern on hand and with a few minor modifications created Lupine's Solstice gift. (I used a double layer of doll skin for a smoother, sturdier appearance, added a nose and pink cheeks, and stuffed her with wool and millet to create a heavy yet soft doll, akin to a real baby.)

DSC_9945

DSC_9947

DSC_9941

I think she's perfect. (So does Sage, that tough eight year old boy, who has been begging for his own ever since Solstice.)

And she took me only a few evenings to complete. Really. Dolls are amazingly easy once you get over the fear that you might mess it up. And hey, if you ever want to learn I'd love to teach you how if you're ever in the neighborhood.

Yes, the new doll is definitely a baby, but leaves so much to the young imagination. Lupine named her Bluebell and calls her "my real baby".

Take that, creepy plastic doll.

Crafting in the Chaos.

DSC_9301

DSC_9314

DSC_9332

DSC_9329

DSC_9312

The weeks leading up to Solstice are always a mad crafting frenzy around here. Add to the crafty scene that we are in the thick of our busiest business season ever and I've found little time for domestic niceties. Yesterday I glanced around the house are could not recall the last time I swept the floors, tidied the play room, or folded laundry. Ew. The messes are piling up, my friends.

No, it is not looking good over here.

Aside from the felt and thread strewn across our house there is no sign of the coming holidays. Not a tree, string of lights, wreath, or stocking. Nada. Zilch.

Goodness. I guess I'm even procrastinating the cheer. (Recently I have found myself delaying holiday decorating a bit more each year. Lately it has been mid- to almost late December before we put the stocking up.) I guess the theory is that if I haven't hung the stockings then I don't have to fill them. Yet. Through some strange math formula I've determined that our lack of decorations computes to more crafting nights after the kids go to bed. I know. It makes no sense.

So today we're hanging the stockings. And even some lights. And then we'll be cleaning and crafting until bedtime.

I keep telling myself that time is expansive, decorations are more fun if you have to wait a really long time for them, and a dirty house builds natural immunity.

Back me up on this.

(Simple) Handmade Holiday Gifts.

 The arrival of Thanksgiving rockets me into a tiny panic of counting the days until our Solstice and Christmas celebrations. How many crafting days do I have left? (Just enough is always the answer.)

What about you? Are you feeling crafting this season? I thought I'd throw together a list of quick and simple crafts that you (or you and your children) can create for loved ones. For new crafters or experienced folks looking for some fresh ideas, this list might just jump-start some creating. Happy crafting!

DSC_0472

Hand dyed play silks: I posted this tutorial for dying silks with kool aide last winter. Obviously great playthings for kids, and if you buy wearable sizes, these are elegant gifts for adults too.

Homemade Vanilla: There is still time! But this one you'll want to start fast. Split 12 vanilla beans lenght-wise, scrape the seeds, and add it all to a pint jar. Cover with good quality vodka. Let sit 4-6 weeks. Pour into bottles with 1 fresh vanilla bean per bottle. Yay, homemade! Amy posted a simple tutorial too if you want photos.

DSC_9538

Simple sack doll: This seems like an ambitious project if you have never made a Waldorf doll, but even a sewer with only minimal experience can make in a few evenings. Really. Easy! And treasured forever. I poked around on-line and found this tutorial, but the Bunting Doll Kit here would be a great choice as well.

Recipe Kits: I have given recipe kits as standard holiday faire for years. Pick your theme (Ice Cream, Grilling out, Pancakes, etc.). Then transfer your favorite 5 or 6 recipes to cards and package up all the non-perishable ingredients for each batch. Throw in a thrifted vintage apron or spatula and you're good to go. (Random side note: One year my best friend and I both gave each other pancake kits with spatulas. It was simultaneously awesome and eerie.)

DSC_8370

Natural Play Dough: Easy peasy! And a guaranteed winner. What's not to love about play dough? Here is a tutorial I posted last year for. (You can even substitute gluten free flour for the wheat if you are making the dough for a little one who is GF.)

Homemade Mustards: When I was in college I gave homemade pretzels and mustard (recipe courtesy of Martha) for holiday gifts one year. They were a huge hit (and cheap and easy to boot). I shared the recipes with my friend Denise who gives them for holiday gifts every year. Homemade mustard is easy. Ridiculously so. (And good. Ridiculously so.) But plan ahead a bit, as you'll want to give it a couple of weeks to develop.

DSC_7966

Felt Crown: Another forever gift for your child, a crown is a key accessory around our place. You can make one for all of your favorite little people personalized with favorite colors or embellishments. There is a lovely tutorial here that I use to determine length for my front, back, and elastic. I then cut the shape to my own taste and embellish in my own style.

Tree Blocks: For the woodworking type, making simple Waldorf-style blocks are easy peasy. I made mine in an afternoon with some minor guidance from a friend when Sage was two. Find some windfallen lumber and a good saw and you're set. Here is a tutorial, with my edit to not varnish them but rub with a blend of beeswax and jojoba oil if you desire a finish.

DSC_8906

Wool Christmas Stockings: These were a quick and impressive project. I can't wait to hang them again this year. Here is my post from last December on how I created them.

Knitted or Croched "Cinnamon Buns" and Play Ropes: For cinnamon buns use your biggest needles or hook to work up long narrowish scarves out of thick wool. For knitting, cast on 10 stitches, and knit is garter stitch (knitting every row) until they are 4 to 6 feet long. Roll them up (thus "cinnamon buns") and tuck into a basket for open ended play. For ropes, crochet thick yarn into ropes of various lengths and colors. You'll be amazed what they are used for! A small basket full is a playroom necessity around here. A great first knitting project or stash buster!

Enjoy the process, and try to not put too many projects on your plate. That can suck the joy out of any holiday. Consider making duplicates for the people on your list (everyone gets vanilla, for example). It will speed up your crafting time considerably. 

Love,
Rachel

P.S. Yesterday's giveaway is still open, so throw your name in that hat if you haven't already done so!


How to Make Paper Lanterns

DSC_9157

DSC_9150

The days here in the north are growing shorted. By dinner time the outdoors are immersed in complete darkness, and when we wake in the morning the sun is still nowhere to be seen. And the days are growing shorter still.

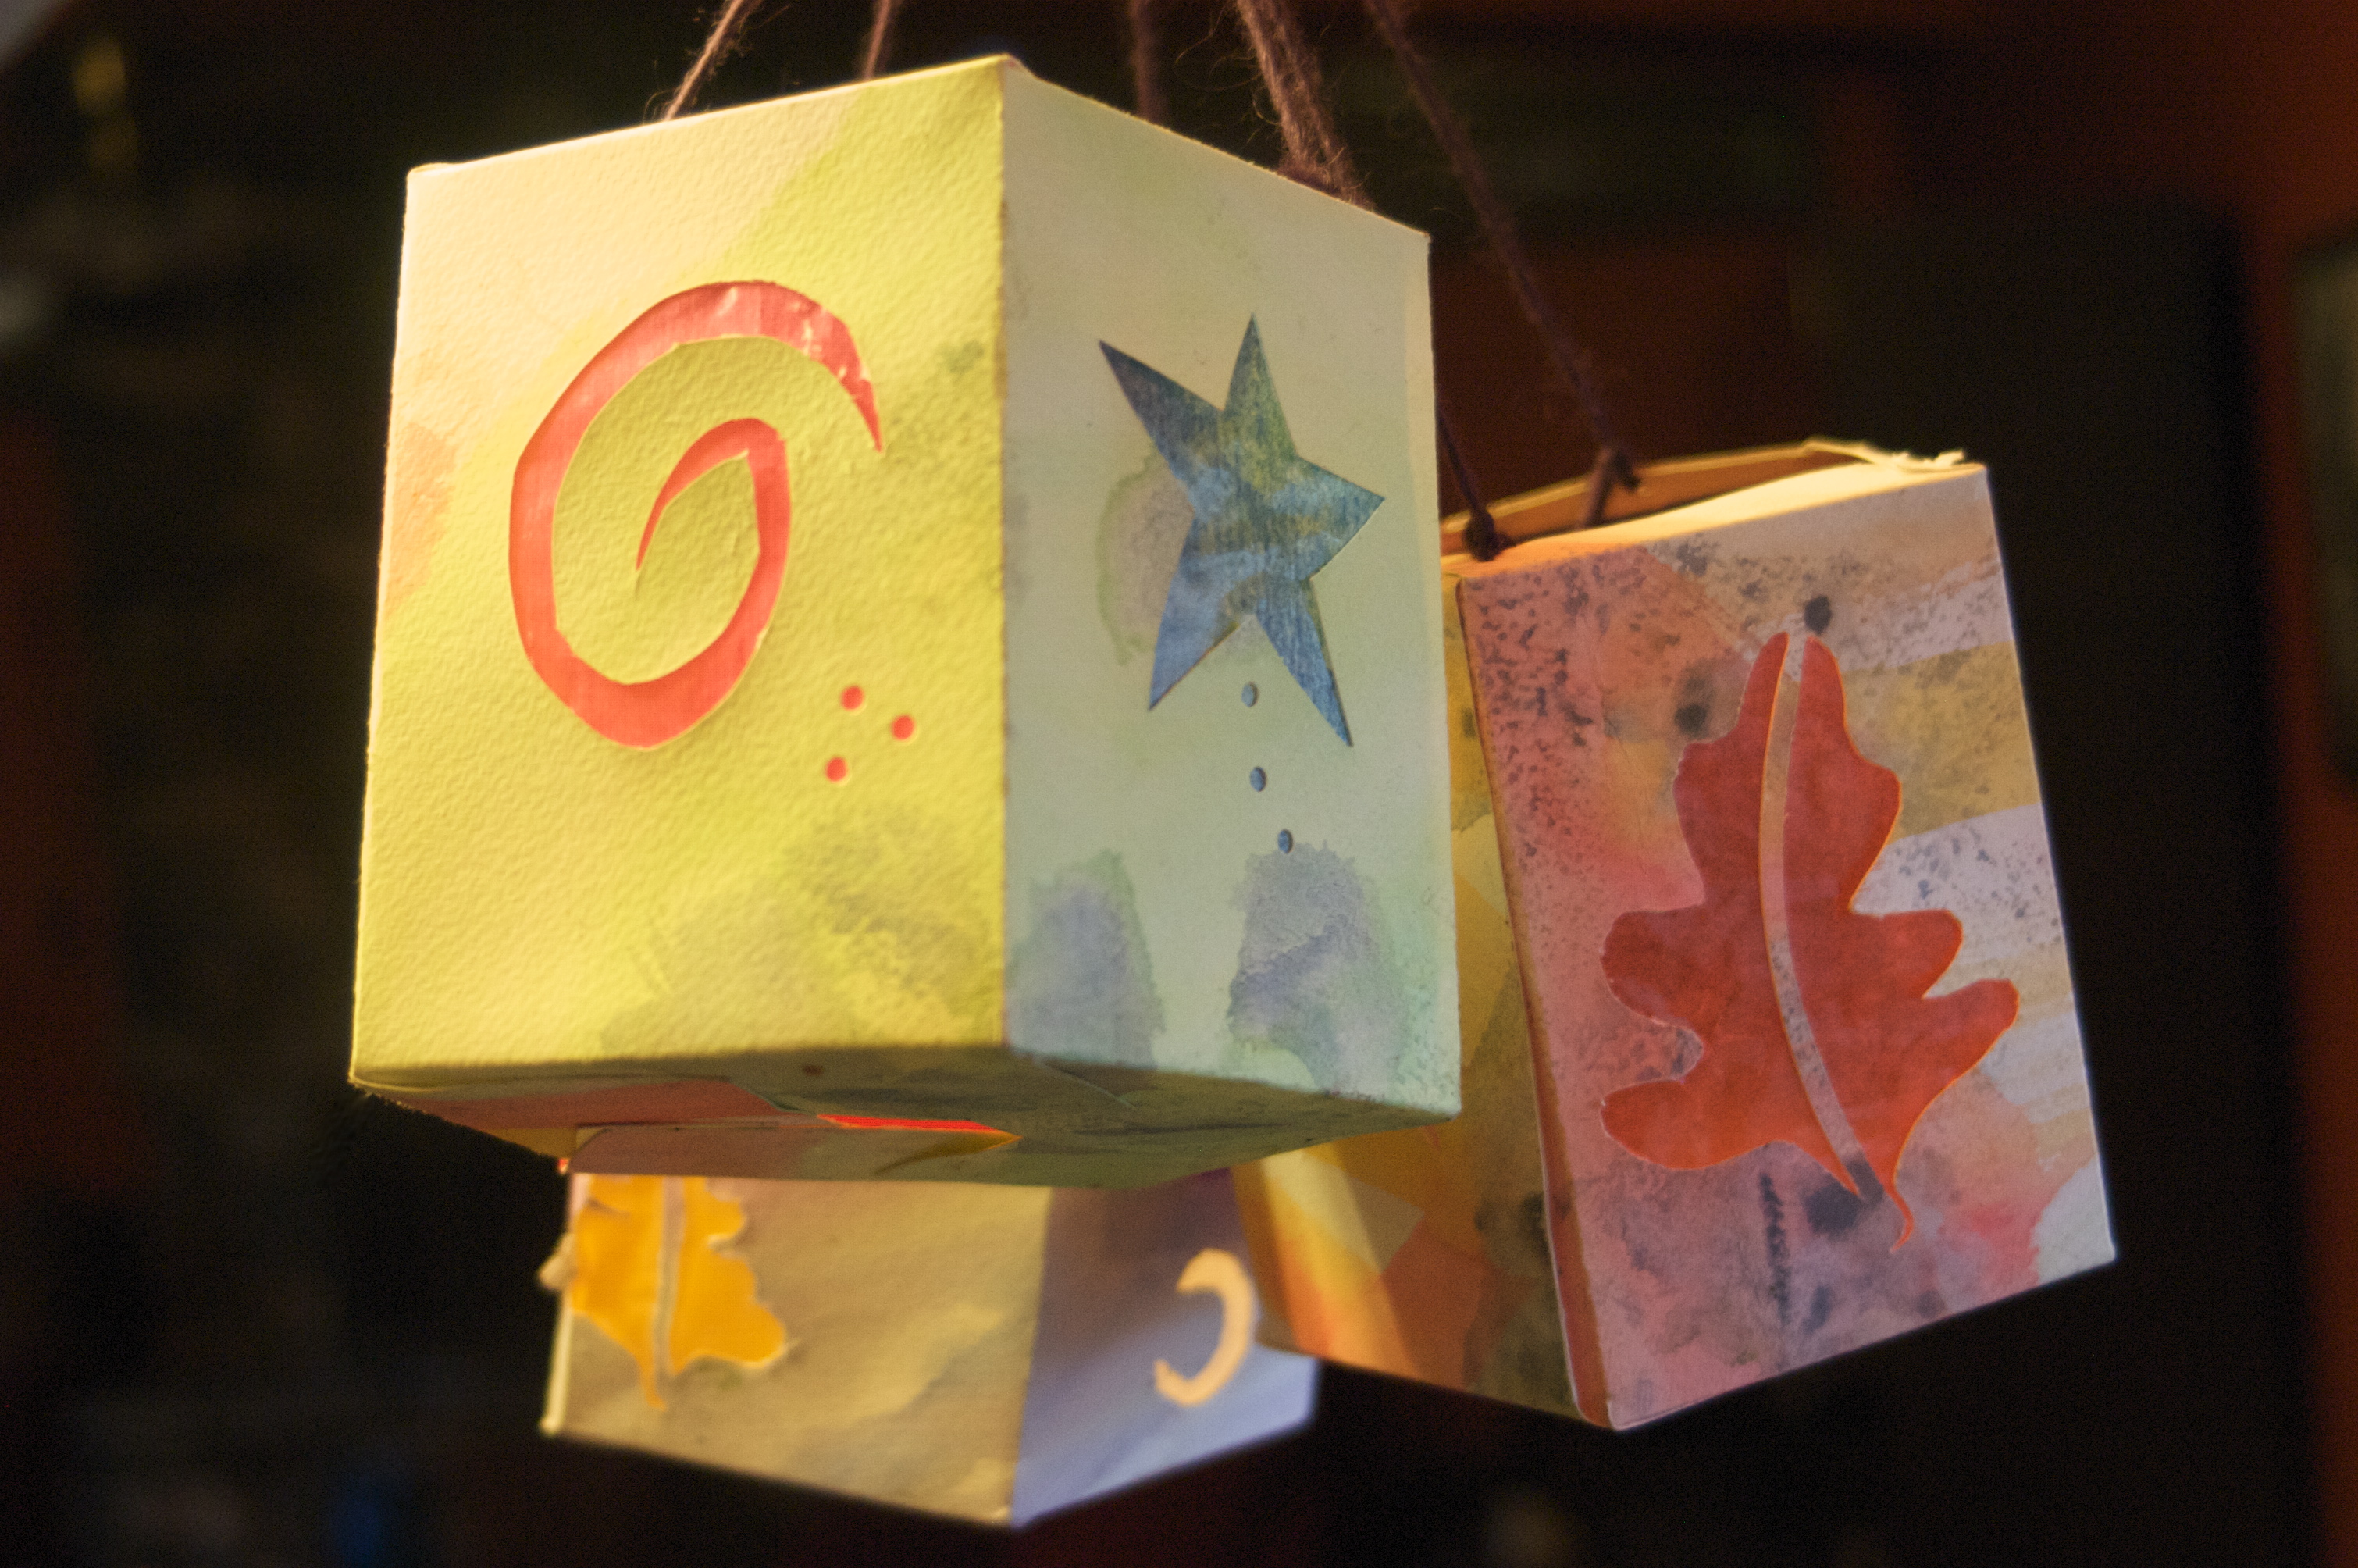
To celebrate the light that shines within each of us (even during these darkest days) the children and I made paper lanterns and carried them out into the darkness for a bedtime walk. The lanterns represent the brightness we bring to the dark, and the positive effect our bright spirits bring.

DSC_9161

The process of making the lanterns is more simple than you might imagine. We loosely interpreted the pattern for Martinmas lanterns from this lovely book (another recommended read) as our jumping off point. I have shared our version of the lanterns below.

Supplies

Watercolor paints

Watercolor paper (ours is approximately 14" x 20", purchased here)

Ruler

Scissors

Pencil

Craft knife

Cutting mat or board

Kite or tissue paper

Glue stick

White glue

5 spring-type clothespins per lantern

Yarn or wire for handle

Hole punch (optional)

Fireproofing spray (optional)

Instructions

1. Create a simple watercolor painting. Allow to dry completely. (You will have enough paper for two lanterns from each piece of paper.)

DSC_9118

2. On the back of your painting carefully mark the following measurements with pencil and a straight edge:

  • Divide the painting in half with a horizontal line. To simplify, you may cut your paper into these two long thin strip now. (Our strips were 7 1/2" tall and almost 20" long)
  • Parallel to your original cut mark two lines: one 1/2 inch down from the top and a second line 2" up from the bottom. These will form the top lip and the bottom of the lantern.
  • Perpendicular to your original line, begin at the left and measure in 1". Mark line. This will be an overlapping piece used to form the lantern during the final steps of the project.
  • From this 1" mark, measure five 3 1/2" panels and mark. These will be the five window panels.
  • Cut off any excess after your last 3 1/2" panel.

3. Score all lines using a straight edge. (This will make folding your lantern easier.) 

DSC_9108

4. Cut tabs for the top and bottom of your lantern by cutting all lines above and below your two long horizontal lines. (Confused? See two photos below for a visual of where you cut.) These tabs will overlap and form the bottom and the top lip of the lantern when you glue the lantern together.

5. With a pencil, draw the shapes you desire for windows on the back of your paper strip. Think simple forms – circles, stars, even rectangular "windows".

6. Use a craft knife (X-acto type) to carefully cut out the windows.

DSC_9141

7. Flip over your painting and admire your work! Add additional details if desired with hole punch or craft knife. I used a small circular hole punch to embellish ours.

DSC_9113

8. Cut kite paper windows the size of your main panels. Glue into place with glue stick and smooth.

DSC_9129

(Note: the next step requires a teeny bit of patience. At least it did for me. The lantern has a propensity to spring open while you are encouraging it to stay closed. Hang tight! You are almost done, and you are smarter than the glue.)

9. Fold your lantern carefully into shape, creasing each scored line firmly. Observe where the flaps overlap on the top, side, and bottom. Apply a thin layer of white glue on each overlapping point, then refold the lantern pressing the glued panels together. (These will be triangles of glue on one end of each flap.) Be consistent with the end you glue (all on the left, for example) so that you can neatly close one flap after another and end up with a firm secure bottom.

10. Use a clothespin at each overlapping point on the top of the lantern to hold the tabs together until the glue is set. Before the glue is all the way dry remove the clothespins. (This way you don't accidentally tear the lantern when you remove the clips). 

DSC_9138

10. Cover the hole in the bottom of your lantern with a scrap of watercolor paper approximately the size of the base of your lantern. Secure with more glue.

11. Punch two holes in the lantern's top rim and string through some wire or wool yarn. Knot yarn securely and add a tea light candle, securing to the bottom with poster putty (if you, like me, lack poster putty gum will work in a pinch, and adds a minty smell to the whole event.) (One thought: for those of you with young children or a concern of you little one holding a paper box with fire inside, battery powered tea lights are a good choice. I believe that the responsibility of holding a lantern with a candle inside is wonderful for a child, but perhaps that should wait until they are 4 or 5.

12. You are done! Now just wait for nightfall and take your lantern with you to spread a bit of light into the darkness.

DSC_9166

DSC_9148


Casting Off.

When we were at the ocean I developed a love of knitting that bordered on obsession. I began work on my first big person sweater (a Cobblestone for Pete), and cast off my first little person sweater for a friend's sweet baby girl. I brought a camp chair and spend my days sitting in the sand knitting away each day. It was my sanity at times. The kids, just over the top of my knitting played contentedly while I meditated away the hours to the click-click-click over the tempo of the waves.

North Carolina 3 033

The baby sweater I cast off was the "In Threes" baby cardigan. For those of you who are on Ravelry the pattern is here. I ditched the detail stitches on the yoke in place of some handspun yarn details elsewhere. The fabric covered buttons I made from a remnant of quilting fabric from another close friend's blessingway a couple of years ago. I love this little sweater so much and can't wait to see a wee red head sporting it around town some day.

North Carolina 3 005

North Carolina 3 002

North Carolina 3 009

Since coming home I cast on (and off) a quick knit of a new fall hat. (The Ravelry pattern is here.) I am loving the teensy cables on the band and the loose spiraled top. I cast it off last night and lay awake wondering what I was going to cast on today. Seriously. Obsessed.

What are your favorite recent knits?

DSC_9076

DSC_9096

  DSC_9077

Crafty Morning.

DSC_8953 DSC_8940
DSC_8933DSC_8948DSC_8936DSC_8928

It's raining in my world. So we're inside, gathering around the dining room table for some crafty magic. Birthday party preparations are in full swing over here. We're all looking forward to tomorrow's merriment. I hope your weekend brings some ribbon, yarn, wood, glitter and glue into your world. See you on Monday.

xo Rachel