Kitchen Day.

DSC_1987

DSC_1983

DSC_1986

DSC_2004

DSC_1992

DSC_1997

DSC_1998

For those of you who are new here, I linked a zillion of my older posts below. Most are recipes or tutorials, so click through and bookmark or pin them for later if you are interested!

~ * ~ * ~

We spent most of yesterday bouncing between the sunny backyard, the garden, and the kitchen. I was determined to be at ease and to have fun – alone or with my kids – throughout the day. A lovely contrast to the dark day before. So that meant that I was mostly in the kitchen.

The day started with Sage setting to work on homemade butter. When the butter was done I made ricotta from the cultured buttermilk. (Much to Lupine's delight. This is her favorite cheese ever. She's joyfully eating a bowl of it even as I type this morning.)

The night before I had taken a bit of mama time while Pete put the kids to bed. To clear my head and pull myself together. I went foraging and rhubarb picking out in the country. I came home with plenty of rhubarb, loads of nettles, and a couple of hand-fulls of watercress. I do so love it here. That I can set off grouchy at 7 PM, fill a cooler with free food, and then sit and meditate creek-side to the sound of coyotes in the hills as the sun (and my angst) slips away. So much gratitude.

The foraging led to nettle drying, watercress pondering (I'm thinking dahl with watercress and spinach for lunch today), and the first canning of the season. Lupine and I made ginger-rhubarb syrup (for fizzy drinks in the summer). The solids we strained out of the syrup were sweetened a bit and canned up for rhubarb sauce.

There was something transformational about pulling out jars and lids and my canning pot and beginning once more to put food by. It was only eight half-pints all together, but it was satisfying just the same. The pantry has been steadily emptying all through the winter, and now it is time to begin to fill it again. I can't wait to see what new recipes find their way into our rhythm this season. (Feel free to link your favorites in the comments!)

Truly, lifting out those jars was the highlight of my day.

After canning we decided to make spaghetti and meatballs for dinner. Well, sort of. The meatballs were made of beef from a friend's farm, the red sauce was from another friend's pantry (we did a pantry trade this winter after I ran out of tomatoes. We swapped canned tomatoes, sauces, salsa, and a chicken for pickled beets, jam, some frozen elderberries, cumin bean pickles, and more. How awesome was that?), and the "noodles" were just zucchini, transformed with this snazzy cutter.

Dinner was early because of a 5 PM appointment, so when we came home just before bedtime we had a snack and then cranked homemade rhubarb ice cream for "dinner". The kids were over the moon that they got to have ice cream for dinner (that 3:45 meal felt like lunch to them) and everyone worked hard to turn our fresh raw cream and rhubarb into a sweet and dreamy treat. (The only modification I made to the recipe in the link is that we reduced the honey by 1/3 and added some stevia. While I prefer the taste of the straight honey, my kids and their teeth are better served by less sweets.)

Today we'll spend with some unschooling friends doing chemistry experiments, scavenger hunts, and costume play (if history is any indicator of how today will go). And we're all looking forward to it. We'll also be making cheese today. More cottage and perhaps mozzarella. My fridge is bursting with milk!

Oh, yes. Messy kitchen season is back.

~ * ~ * ~

In reflection to yesterday's post, thank you. I love you. For real. In so many ways I write here for you, but in truth I guess I write here for me too. Maybe mostly for me. And revealing that shadow side and being met with love and acceptance was freeing. Thanks for sharing your own shadows in the comments. Big hugs to you all. What an amazing community.

xxoo Rachel


Making Cottage Cheese.

DSC_1331

DSC_1337

DSC_1345

DSC_1367

DSC_1372

DSC_1377

Cheesemaking is arguably not the most photogenic kitchen project. Especially when photographed in an orange and purple kitchen, after dark, under fluorescent light. But that's how it goes. I couldn't wait to share our latest passion with you so you get the ugly pics.

Last week we picked up an extra gallon of milk from the farm for cheese making. Our intention was mozzarella but somehow we shifted our plans and went for cottage cheese instead. We made the recipe for large curd cottage cheese from the book The Home Creamery. And while the recipes in this book are designed for pasteurized milk, it worked perfectly with raw milk.

The process was so simple that the kids did most of the work. (Okay, Lupine did most of the work, but Sage jumped in to measure ingredients and stir a bit too.) And I would profess that if my five year old can do it – very nearly on her own – you posses the skills to make it too.

One gallon of milk made around four cups of cheese. Then I cooked the whey again and was able to get a 1/4 C or so of ricotta. The rest of the whey went to my dogs as a treat. Nothing was wasted. Even the jars get washed and refilled. I love that.

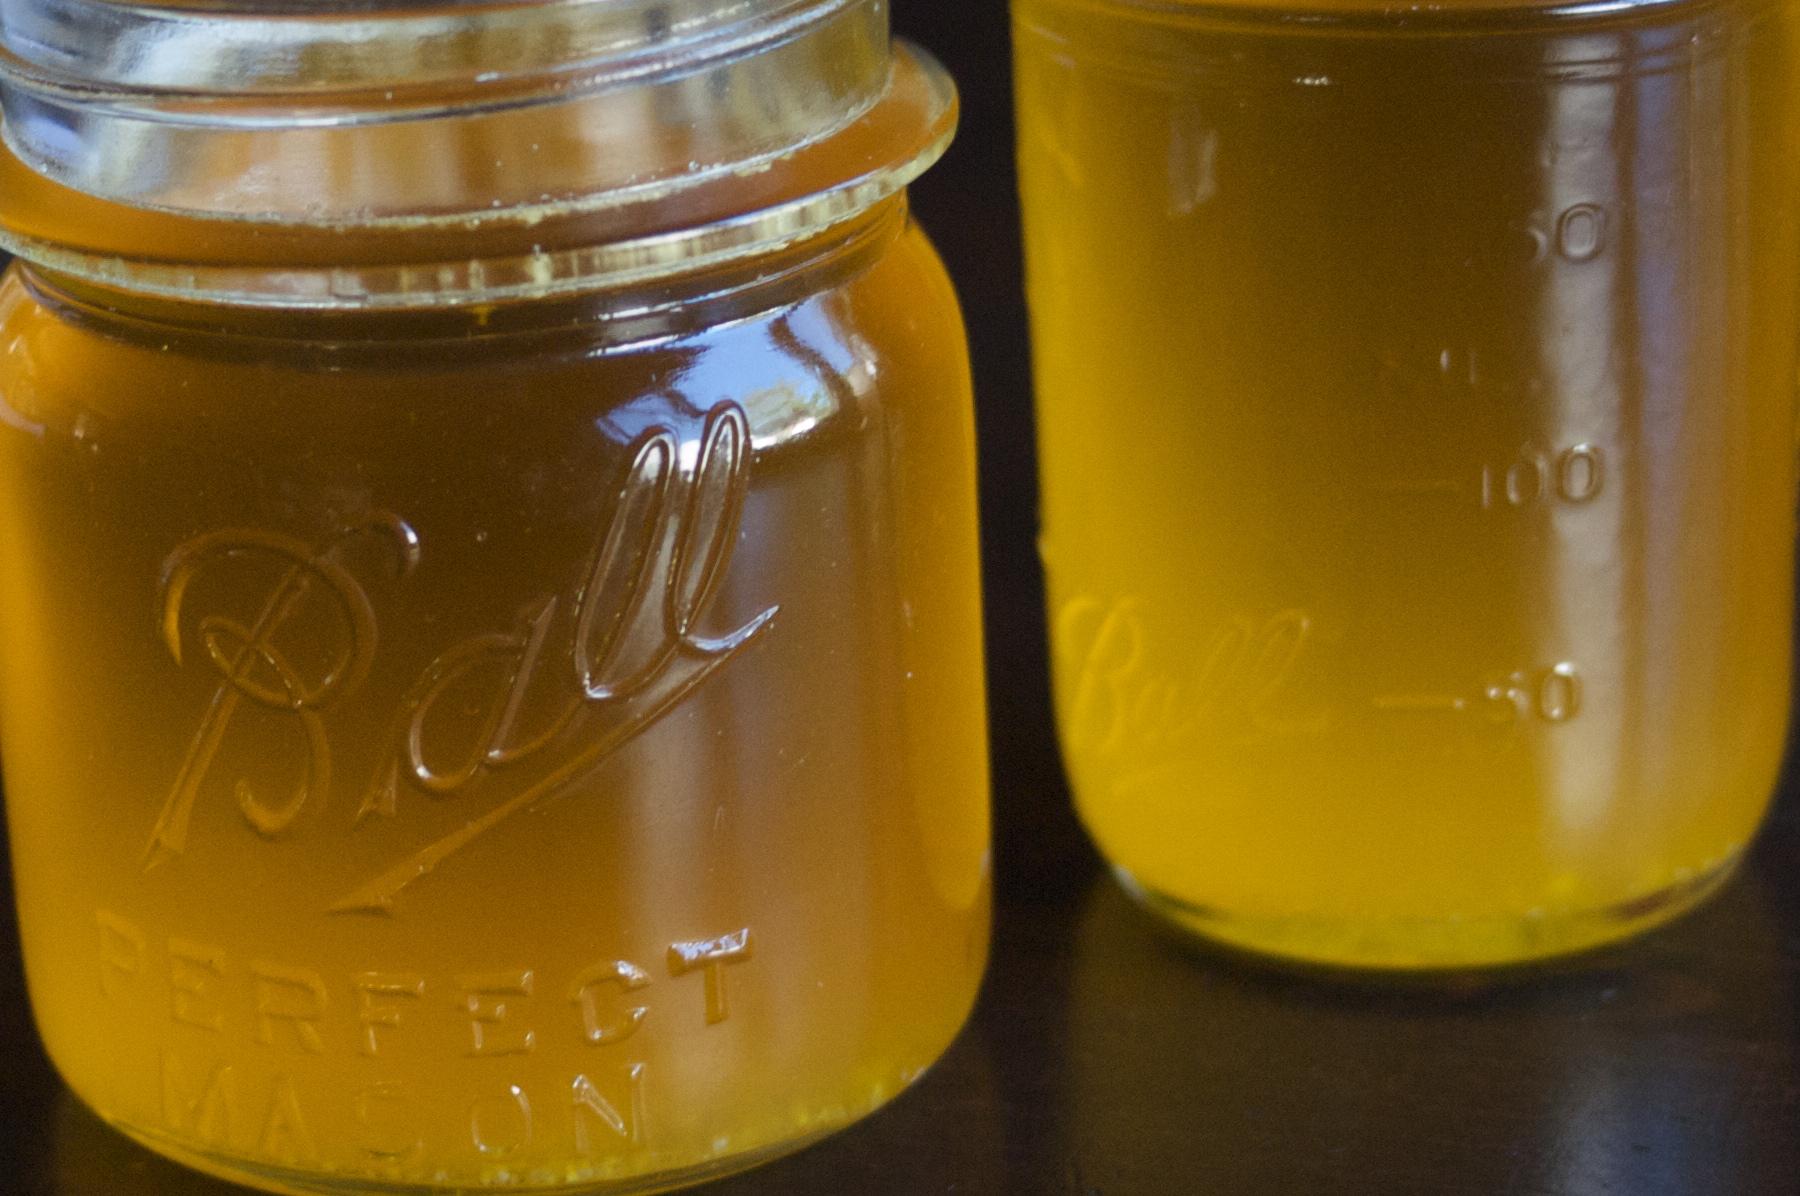
Before I dig in and tell you about the cheese, let's talk milk quality for a moment. (No, not raw-vs-pasteurized, but if you want to have that chat we can.) I mean vitamins. We get milk from two different friends. Both farm organically, but one has their cows out on pasture already and the other does not. If you look at the top photo, can you see the difference in their milk? It's not a lighting trick. There is a reflection on that jar, but the color is dramatically different in person. The bottle on the right has a golden hue to it. That's what you are looking for. The white milk most of us grew up on is lacking the nutrients that we need. It's from a cow that wasn't fed it proper diet and is vitamin deficient. The more yellow or golden your milk or butter, the better it is for you.

As an aside, I taught a neighbor how to make butter for a school project. We had raw summer cream, skimmed from our pastured cow's milk. They had a pint of conventional heavy cream from Walmart. When we were done our butter was bright golden yellow, theirs was almost pure white. And pretty much devoid of nutrients. Grass-fed dairy was a part of Lupine's healing protocol for early childhood tooth decay. The white milk had no place in that protocol. What color is your butter?

Okay. Enough milk talk. Back to the cheese.

A basic cottage cheese recipe is so simple. All you need for the batch we crafted is milk (raw or otherwise), rennet (we buy ours at the coop but a cheese supply store would work too), and a splash of cultured buttermilk.

And how did it taste? Well, my intention was to photograph the final product in a lovely bail-top jar the next morning. By the time I got my camera, the entire batch was gone. In Sage's words (my cottage cheese addict), "That was the best cottage cheese I've had in my entire life!"

If you are looking for more homemade dairy recipes, I've shared simple tutorials for butter, yogurt, and ricotta cheese. And while I don't feel right about sharing the recipe from the book we used, this one looks pretty darn close. (And he got the pretty "after" shot of the cheese in a bowl.)

Here's to making your own!

Thick Homemade Eggnog Recipe.

Happy Solstice dear friends. Today is our biggest (and most loved) family celebration of the year. We'll be staying up late around the fire, making gingerbread houses and clove oranges, laughing and celebrating the return to the light. The celebration will continue into tomorrow and then we'll roll joyfully toward Christmas Eve with my family. I love this time of year.

And each day we'll be drinking eggnog. My recipe (below) is a small Solstice gift for you.

Every year I'm lured into buying a quart here, a quart there of eggnog. I can't resist. But store-bought (even the organic, corn syrup-free sort I have available to me locally) is far to sweet for my palate, and well, it's not homemade. This year I finally made my own. What exactly was I waiting for? It's quick, easy, and so good you might just feed it to your kids for breakfast. (Like I just did.)

DSC_8856

DSC_8857

If you prefer a thinner eggnog you can make the recipe below without cooking (if you are comfortable with raw eggs) or omit the extra yolks.

Thick Homemade Eggnog Recipe

4 C whole milk (mine is raw, but as you will cook it use what you have)

1 1/2 tsp freshly grated nutmeg

2 eggs and 3 yolks (best eggs = best eggnog)

Maple syrup or honey, to taste. (Start with as little at 3 Tb. per batch. Purchased nog comes in in the 6+ Tb range. We love ours far less sweet with just 3-4 Tb, but if you are adding alcohol – or have a sweet tooth – a bit more sweetness may be preferable.)

1 1/2 tsp vanilla extract

How To Make Eggnog

Gently heat milk and nutmeg to very hot but not boiling.

In a separate, heat-proof bowl, whisk eggs and yolks together. Set aside.

When milk is steaming hot temper eggs by adding hot milk 1 Tb at a time and quickly whisk in. Repeat this process until you've whisked 1/4 cup of milk or so into your eggs. (This process keeps your eggs from turning scrambled when you add them to the hot milk.)

Add eggs to hot milk and whisk. Heat over medium heat until the nog begins to bubble and thicken, whisking all the while. Remove from heat, cool a bit, then add maple or honey and vanilla.

Allow to cool to a good drinkable temperature, then puree with your stick blender or regular blender or pour through a strainer if you prefer a perfectly smooth and thick eggnog. Or just drink it up if you aren't particular about these things.

It'll be gone in ten minutes. I promise.

Wishing you a beautiful holiday. I'll be back here next week!

Love,
Rachel

Recreating Tradition.

DSC_8663

DSC_8665

DSC_8668

DSC_8669

DSC_8672

DSC_8679

DSC_8687

DSC_8697

DSC_8709

I'm Norweigian. Mostly. Er, energetically anyway. Regardless of the actual percentage, culturally I am Norwegian. And today I'm standing here in my Norwegian great-grandmother's apron and thinking about holiday traditions.

Since going grain-free/gluten-free about year ago I've begun to long for the old standards. Especially during the holidays. Lefse. Krumkake. Rosettes. So this year I decided: grains be damned, I'm having a traditional holiday.

Today Lupine pulled out the rosette iron. My grandma's. Yes. We'll figure it out. Gluten-free rosettes sound easier than grain-free bread in my opinion.

Lefse. That's my real love. My Gram and I made it together each year until she died. During the last year or two she spent most of her time at her round kitchen table, entertaining baby Sage while I made the lefse alone. And then she died. And the lefse making fell entirely to me for my family. I missed her humor when I made it without her, and her coffee and request to "eat ourselves sick on the trims". Last year life got in the way and I skipped lesfse making altogether (the first year ever, perhaps). That felt like such a downer when Solstice and Christmas came and there was no lefse on the table. So this year I'm thinking… can I do it gluten-free? We shall see.

Tonight we stated slow. Thumb-prints. Grain-free, sugar-free thumbprints. I used this recipe as my jumping off place, subbing in 1/3 C of honey for the sweetener, a blend of homemade butter and coconut oil for the palm oil, and my homemade raspberry jam for store-bought.

The result? Yum. Even gram would agree.

(An unrelated side note: Thank you for your comments and emails after my last post. It was pretty heavy. I don't normally go into that shadow space but for this I needed to – it feels like an important part of my process towards healing. Sage is well this morning. His fever finally gone, and the promise of a quiet day together in the kitchen is lifting my spirits. xo Rachel)

Natural Whooping Cough Remedies.

Herbal remedies for pertussis | Clean : : the LuSa Organics Blog

Herbal remedies for pertussis | Clean : : the LuSa Organics Blog

Herbal remedies for pertussis | Clean : : the LuSa Organics Blog

Welcome to Clean. I'm happy you stopped by. This page has seen a lot of traffic recently. While you're here I invite you to explore a bit. I post weekly on peaceful parenting, homeschooling, kitchen adventures, and general craftiness.

Blessings,
Rachel

 ~ * ~ * ~ * ~

Pertussis is one heck of a cough. It starts as a small, benign cough, maybe a little fever and then – wham. Long, powerful coughing spasms take over the rhythm of your day. Many people I know have it or have had it in recent years. Presently it is making its was through our town and early this month Sage, Lupine and I came down with it too. Good times. Quarantining ourselves, we haven't been out and about since early October (thus the scanty posts here) and we've focused most of our energy on resting and healing.

While this post is hopefully written for a select few of you, I trust it will be of service to some. Bookmark it, share it with your friends, and file it away in case whooping cough finds its way around your community any time soon. It's in our little town right now in a big way. As more people in my area (and elsewhere) have found themselves staring down pertussis I thought that a post collecting some good home remedies for whooping cough would be a blessings.

No whooping cough in your neighborhood? (Well, hooray for that!) Still, many of the remedies below are amazing for any cough, cold, flu, or bug that comes your way this season.

This is in now way a health consultation. Get on the phone to your doctor or health care provider if you suspect you have pertussis. If you test positive (the test is a simple nasal swab) you will likely be encouraged to take antibiotics and quarantine yourselves for five days. If you go antibiotic free you'll be in quarantine for most of a month (beginning after the last person starts coughing in your house). For us it has been a hassle but not a big deal. Pete is healthy and working. The kids and I are sick and staying home. It's a lot of coughing but I'd take this over the flu or pin-worms any day. (That being said, pertussis is especially dangerous for babies, the elderly, and anyone with a compromised immune system. We don't fit into those categories so it hasn't been horrific. Just icky.)

Here are some of the things we've done to ease our transition back to health.

Herbal remedies for pertussis | Clean : : the LuSa Organics Blog

Herbal remedies for pertussis | Clean : : the LuSa Organics Blog

Pine Needle Bergamot Syrup

When Lupine started coughing we had no idea it was whooping cough. Just a little cough during the day, nothing dramatic. She and I were on a hike with my sister at the cabin. She reached out and picked a handful of white pine needles and stuffed them into my pants pocket. "Mama, I want you to make me pine needle tea." We had never had pine needle tea before. We read once in a children's herbal book that you could drink pine needle tea, but I couldn't remember why. After we determined that it was pertussis I called and herbalist friend who's child had also contracted it around the same time. "The best remedy for whooping cough," she told me, "Is white pine needle tea."

What a shining lesson in trusting our intuition, spirit guides, or the voices of the plants. Pine needle tea and syrup has been my favorite remedy for whooping cough. We dilute the syrup in hot water and drink it throughout the day.

Begin by collecting some fresh white pine needles and/or bark. Take two large hand-fulls and add to a stainless cooking pot (approximately 1 C of needles if you could jam them into a measuring cup). Add 1/2 C of dried monarda (bee balm) flowers and leaves if you have any available. Cover with water, adding approximately 3- 4 C. Simmer until you have cooked the water down to a thick tea, about 2 cups. Strain and mix with equal parts honey. Store in the refrigerator and use as needed, by the teaspoon. Take as a cough syrup or dilute and use drink as tea.

Garlic Syrup

A local herbalist/mama shared this recipe in our local newspaper a couple of years ago. (There is one type-o, where the article reads "4 hours" should say "4 days". Thanks D. for bringing the article to my attention.) We have been taking this throughout our illness and it seems to be a wonder tonic. This is a good one if you are exposed to someone with WC as well as just general immunity boosting throughout the season. A quick google of "garlic syrup" yields dozens of formulas, so pick one and go for it.

We are using this:

1 pound garlic, peeled and chopped

apple cider vinegar

water

honey

Place chopped garlic in a quart jar and cover with 1/2 water and 1/2 apple cider vinegar to fill the jar. Infuse for four days (or more), shaking often.

Strain, pressing garlic to extract all the juices you can. Make a simple syrup of 1/2 water and 1/2 honey to total the volume of your garlic infusion. (If you have 2 C of garlic infusion, add a simple syrup made of 1 C water and 1 C honey. I pour 1 tsp of this in a small cup for the kids several times a day and take 1 tablespoon myself. This is a great remedy for cold and flu season and shouldn't be reserved just for whooping cough. Spread the garlic out on a cookie sheet in the freezer and use in your cooking.

Vitamin C

Vitamin C saturation is one fairly common method of shortening the duration of whooping cough. I found suggestions for this online and it always led me to take sodium ascorbiate. I couldn't find that version of C without food coloring added, so we went for Ester-C. Each of us takes 5000 IU per day. To determine correct dosage you can follow the instructions here. We didn't exactly follow this method but it was close to what we did. To make pure vitamin C palatable for the kids I powder the capsules in my food processor, then blend with a dab of honey to make a paste.

Herbal Cough Syrup

This is a wonderful remedy for nighttime coughing episodes. Use equal parts elecampane and wild cherry bark, 1/4 C of each and 2 C water. Bring to a simmer, turn off, and steep for 10 minutes. Strain promptly and mix in 1/4 C of honey to make a thin syrup. (You can leave out the honey but elecampane is bitter, especially if you simmer it too long.) Dilute syrup with water and sip as needed, or drink undiluted by the teaspoon (kids) or tablespoon (adults).

Elderberry Tincture

I shared with you how we make it here. We're also enjoying some elderberry syrup this year, made using a recipe from here I think. (I love this book. The recipes are so simple and accessible. Ask for a copy for Christmas or Solstice if you have been wanting to learn more about plant medicine.)

Herbal remedies for pertussis | Clean : : the LuSa Organics Blog

Immunity Building Tincture

The kids and I made this in the spring and we're loving having it on hand right now. We combined echinacea root and flower, usnea (an immunity-building lichen), rishi (the shelf fungus pictured above), cinnamon, and ginger and covered with apple cider vinegar (enough to cover). It sat for 4 months, we strained it and now add a few drops to our water or tea each day. So good to have on hand, but it requires some mindful work in advance. If you don't have anything similar lying about (unlikely for many I expect), pick up a good quality echinacea tincture. That will do the trick, too. If you want to make a tincture now, you can buy all the herbs your local food coop doesn't carry from Rose Mountain Herbs.

Humidifier with Essential Oils

Every night I refill our humidifier and add LuSa Organics Breathe Deep Essential Oil to the essential oil cup or the water. So lovely, if I do say so myself. We've also used a healthy dose of LuSa Organics Chest Rub this month. I can't imagine not having this on hand but if you don't, straight eucalyptus essential oil will help as well in the humidifier and you can add a couple of drops to a balm of your choice and apply to chest and back.

Herbal remedies for pertussis | Clean : : the LuSa Organics Blog

Homeopathy

There are a few remedies recommended for Whooping Cough. This site gives a good break-down of recommendations.

Rest, rest, rest.

Because you are healing. Your immune system is working. Your body is amazing. Give it time to rest. Nourishing food.

And when all else fails, brandy.

Okay. I'm kidding with that one. But do what you have to to get some sleep. Your nights will be disturbed by lots of coughing, so go to bed early and sleep as long as you can. (She writes through bleary sleepy eyes.)

Wellness blessings to all.

Love,
Rachel

Butternut Squash and White Bean Soup Recipe.

DSC_7220

DSC_7219

DSC_7217

DSC_7234

DSC_7223

DSC_7237

(I know. That's not a butternut squash up at the top of the post. But the cut up one is! Another great example of use-what-you've-got.)

I made a soup this weekend that I could eat every day. Warm and sweet and savory and nourishing through and through. Local butternut squash. Kale and sage from the garden. White beans. Homemade stock. Amazing goodness in every way. I love food like this.

Pete and I thought it was the best soup of the year. The kids were honestly so-so about it the first day, so on day two I added a few pieces of crispy bacon minced up and, well, there was none left for day three. Oh, my. (Mind you I haven't had bacon in most of a year since it is not GAPS legal -sugar in the curing process- so it was over the top for us all.) Hallelujah. With the added bacon it was elevated to the best soup ever.

Since I made this up as I went along and I never measure anything, there was no recipe. But I love you. So I did my best to make up a recipe so you can share in a bowl of my new favorite soup. You can't go wrong with this combination. And so while my quantities below are a bit sketchy, go with the flow. You'll find your own perfect combination. 

DSC_7243

Autumn Squash and White Bean Soup

1 medium-sized squash, cubed and roasted (I used a butternut but the red kabocha pictured at the top will be in the next batch later this week.)

1 qt of just under-cooked white beans. (Ideally you will first soak for 24 hours in water and 1 tb of whey from your yogurt; drain, rinse, and cook in bone broth for 20 – 40 minutes on low heat with 2 cloves of garlic.)

1 large bunch of kale, approximately 12 decent sized leaves, stemmed and chopped

1 small bunch of fresh sage or a big pinch of dry (if fresh use 8-10 leaves)

1 medium sweet onion, chopped

2 cloves of garlic, minced

Butter, ghee, coconut oil, or bacon grease

6 slices of crispy bacon, chopped

Salt to taste

Bone broth (4 C or so) (Homemade. Please?)

In your favorite soup pot, saute onion in 2 Tb of fat until translucent. Add garlic and cook for another minute. Add cooked white beans, roasted squash, and enough bone broth to cover. Stir, salt, and bring to a simmer. Remove 1/4 of the soup and puree until smooth. Return to pot, add kale, and stir. Cover and simmer until kale is tender. Serve topped with crispy bacon (or not).

Eat, laugh, and then dance around your kitchen pondering where this lovely soup has been your whole life.

Love,

Rachel

P.S. Do take the time to make your own bone broth this season. All you need are the leftovers from any meat-eating you do (fish or beef bones, chicken carcass etc.). It might be the single most important thing you do for your and your children's health. I've always made my own stock but bone broth became vital when we noticed Lupine's early childhood tooth decay. We need what's in this magic potion! Every. Day. Okay – stepping down off my soap box. Or bone-broth-box, as it were.

Foraging and Putting Food By.

DSC_7051

DSC_7059

DSC_7062

DSC_7048

DSC_7054

My fingers and thumbs are purple today. From grapes, raspberries, and elderberries. I spent yesterday out in the rain with another homeschooling family, foraging and marveling at just how fast autumn is coming on. It was gorgeous out there. 

We brought home so many elderberries! The elderberry season had wound down and my friend and I were both wishing we had harvested more. Then we looked up, and all along the forest edge were some late elderberries, hanging down from the branches. We were thrilled and set to harvesting. As we drove home we kept finding great clusters of elder along the country road and stopped our cars again and again to fill another bag and another and another. We were both bordering on giddy. I am up to my ears in elder! What a blessing.

I also harvested wild grapes and plenty of raspberry leaf to get us through the winter. (Raspberry is a wonderful tonic for women. Along with dried nettle I try to drink it daily as tea.)

And so last night (and this morning) was busy in the kitchen. I made a half-gallon of elderberry tincture, twenty half-pints of raspberry jam with honey (from a nearby farm), a half-gallon of kefir, and got rolling on a batch of pickled beets. (Those are in the canner right now.) Oh yeah, and that was on the heels of butter and yogurt with more butter to be made this afternoon.

The freezer is bursting. The shelves are loaded. And fall is here.

(Now all I need to do is end my garden-denial and get out there to harvest the bushels of greens, basil, beans, peppers, and tomatoes and then I can throw in the towel!)

I'd love to hear what is happening in your kitchens this week.

Love,
Rachel

How to Make Ghee.

DSC_6686

Ghee. Simple as can be, but wonderful beyond description. Made from butter (just butter!), ghee is my favorite fat for any high-heat application. Unlike butter, olive oil, or coconut oil (our other go-to fats) it has a high smoking point and so can tolerate the high heat of sauteing or stir frying. Ghee also provides lots of wonderful nutrients (like the X-factor, or vitamin K2) for healthy teeth and bones. That's the main reason we hit the dairy so hard around here, because of our history with early childhood decay.

Ghee is made by heating butter to remove the moisture and milk solids and it a solid at room temperature. It can be expensive to buy (like many things) but quite affordable if you make it yourself. Here is how I do it:

DSC_6027

DSC_6029

DSC_6033

Begin with your butter. I made my own immediately before making the ghee because that's how I roll, but you can simply purchase good butter at the store. (I hear people do that – buy butter.) Making your own butter is totally unnecessary but adds something special to the whole process. At least for me. But I digress.

However you get your butter, go and get some.

DSC_6035

Next, over low heat, melt your butter. High heat will result in burning, which you don't want. So exercise your patience here.

DSC_6036

DSC_6038

When your butter is melted allow it to simmer steadily. The milk solids will begin to froth a bit and float to the surface. Your butter will bubble noisily away. Skim the solids off carefully so as to not disturb the lower layers of butter. I add these to my dog's food for good fats, but I suppose you could either A) eat them like butter or B) throw them away. All I know is you don't want them in your ghee.

As you skim, keep in mind that there are two things happening in your pan – a sinking and a floating of what separated ghee from butter. Once that stuff is gone you've got ghee. You are skimming the floating bits without messing with the sinking bits. Make sense? Carry on.

DSC_6040

Continue to simmer your ghee. You will see the solids reducing in quantity, and the thick yellow boiling butter slowly turn to a transparent amber. Keep skimming any time you see what I see in the photo below.

DSC_6041

DSC_6042

As soon as your butter is completely transparent and smells toasty and nutty and wonderful, your ghee is done. Skim off any remaining solids or add a tiny pinch of salt to help them sink. Allow to cool a bit before you transfer to your jar.

DSC_6043

Not sure if yours is done? One trick is to carefully tip your pan. You will see small bumps sticking to the bottom. My flavor preference for ghee is to wait until these become a light brown, just toasted. It adds a wonderful nutty flavor to the ghee. If your bumps are still gooey and white and looking like melted cheese, you need to cook it for a bit more.

When your ghee is cooled a bit, carefully pour ghee into clean glass jars and allow to cool completely. Your cooled ghee should be a solid at room temperature and will keep for ages in the pantry.

DSC_6683

DSC_6687

Pretty. Healthy. And yummy. Can't beat that.

P.S. Our favorite way to enjoy ghee is stirred into a cup of gently warmed raw milk with a drop of honey. Our perfect bedtime treat. My kids call it "Ghee Tea" because it rhymes. There is no tea in there. But it's fantastic.

A Day Away (thought not exactly a “day off”).

DSC_5899

DSC_5747

DSC_5771

Apples to sauce, tomatoes to can, grapes to juice, elderberries to harvest, and beets to… to do something with. Today is full my friends. Between hanging with my children and filling the pantry, today is packed.

I'm striving for greater presence with my family, so I am taking today off from this space. I'll be back here tomorrow with something for you all!

Love,
Rachel

How to Make Applesauce.

DSC_6419

How kind your comments were yesterday. Thanks for all the sweetness. Yes indeed, this growing up business is something. In other news, my kitchen has been busier in the past week than even the last flurry of food preservation. It has been quite the summer for putting food by.

This weekend's foraging left me with bags upon bags of apples all around my kitchen. And, um, a full-sized cooler filled to the top. We had some apples to contend with. Because they were wild, many weren't going to keep. I picked through them and set aside a basket of perfect apples. The rest headed to the cooking post. Apple sauce, apple cider, dried apples, and apple butter are all good options for your imperfect apples. I know how we eat, so sauce was my first priority.

The process is ridiculously simple. If you still buy applesauce at the store you might stop after reading this. Note: I use a Victorio food mill that I picked up at a thrift store (similar to this mill) for $5 and I love it so. If you don't have a food mill of one kind or another, you'll want to stem, peel, and seed your apples. And I send you my apologies. (It will take longer but is still ridiculously easy.)

DSC_6372

DSC_6377

DSC_6379

DSC_6381

DSC_6387

DSC_6391

DSC_6395

DSC_6401

DSC_6403

DSC_6406

DSC_6420

Quarter all the apples you have. Leave the seeds, skins, and all. We'll deal with them later. Cut out any bruises or creepy spots.

Transfer to your biggest cooking pot. Stainless is best, but use what you have. For every 8 C of apple chunks add 1 1/2 C water. Add a splash of lemon juice, 2 T for every 8 C. (I added chai spices to one batch – cloves, fresh ginger, cinnamon, and cardamon – and left one batch plain.)

Bring to a simmer, then lower heat and cover. Stir occasionally to prevent scorching.

When the apples are soft (20 – 40 minutes, depending on size of batch and type of apples), cool slightly, then transter to your food mill and process.

Pack into jars and can in hot water bath for 15 minutes. Remove jars carefully, then gaze with satisfaction at your work.

A few notes…

1. Yes, I let my kids work with burning hot apple sauce. It's good for their character. I love that I don't even ask them to help but they hear the food mill and come runnin'! This is a great job for kids.

2. The apple sauces are various colors because some were made with crazy wild apples that literally turned brown 5 seconds after I cut them. Even with lemon juice. So I added some spices to that batch and called it Spiced.That made it seem like I did it on purpose.

3. Thank you for ignoring the bags of fruit and baskets of laundry the background.

4. And finally, yes you too can manifest a food mill for $5. I did so as follows: Sage was a baby. Amazingly, he fell asleep in the car. (This almost never happened. Literally, I can count the occasions on my fingers.) Pete and I were on the way to the thrift store. We wanted to capitalize on the nap, so we decided to take turns going in. While Pete shopped and Sage snoozed I thumbed through a Lehman's catalog that I had in the car. (What? You don't carry a Lehman's catalog in your car? I lived off grid. I got off on the hand-crank blenders. What can I say. Get a Lehman's catalog and put it in your car. You never know.) I saw this exact food mill in the catalog (for $75) and said "Ooh! I want one of those!" Then Pete came out of the store and I went in and found one for $5, did a little dance, and then we went home.